|
Tech. Info, is a class that is based off of science. The unit that we are currently on is learning the function of a rockets and the parts that go with it. This is only a semester class, and you will switch off and go to drafting the next semester. This class would rather much be preferred to as the "Science Workshop."
|
The Water Rocket

One of our "constructive" projects that we created, was known as the water rocket. As presented in my presentations for computers, pressure builds up inside the rocket, and when you launch the rocket, the water shoots out of one end, while the rocket goes in the opposite side. Newton's Third Law of Motion is a huge contribution in terms of how the rocket goes about. As the equation goes, it was "For every action, there is an equal and opposite reaction." Basically, if the fuel, represented as the water, is coming out of one end, and the rocket is taking off for flight in the opposite direction. The rocket will continue to go in the same direction until a net force is there to stop it. The quantity of materials may vary depending on how many fins you would like to attach to the rocket. The more fins that you add on, the more controlled the flight of the rocket will become. However, more weight will be added onto the rocket, therefore the distance will decrease. For starters the main materials needed might consist of: a bottle rocket, about one gram of clay, a weighing scale, some index cards, and duct tape. The soda bottle will stand as the body, or vessel of the rocket. The clay will be at the end, towards the tip of your rocket to equal with the weight on the other end. Both sides need to be about equivalent so the flight will be smooth, and not rocky. The weighing scale will be used to measure the clay, so you don't accidentally ad to little or too much in the end. The index are the most vital part; as they will be used to create your fins. You would cut a thin piece into a thin strip, and cut a tiny slit into it. Being delicate with these paper pieces is important, so you don't end up folding, or breaking one. Once you created all your strips, you can fill them into the fins. Now you have to measure the diameter of the bottle rocket so you can precisely know exactly where to put your fins on. The strips of paper inside the fins help support it, to keep it straight. After measuring the diameter on the bottle, you can successfully put the fins on according to how many you have. Us the duct tape to secure the fins, and you will be finished with the process.
Some of the skills accommodated with building this rocket, are mostly math skills. Measurements and accuracy all fall onto math topics. Teamwork is also a very vital part of building this rocket. You had the option of going solo with this project, which would have been more difficult to accomplish on your own. With the help of someone else, you could finish the rocket twice as fast. Pacing yourself in this project can also reduce the stress level that you can contain. Take one step at a time, instead of trying to take one 576,987,347 things at once.
Some of the skills accommodated with building this rocket, are mostly math skills. Measurements and accuracy all fall onto math topics. Teamwork is also a very vital part of building this rocket. You had the option of going solo with this project, which would have been more difficult to accomplish on your own. With the help of someone else, you could finish the rocket twice as fast. Pacing yourself in this project can also reduce the stress level that you can contain. Take one step at a time, instead of trying to take one 576,987,347 things at once.
Newton Sleds
One of the many great projects we worked on, was the Newton Sled. Although the name may intrigue some individuals, the process isn't that complicated. First, you take a wooden block, with two screws on the opposite end of the same side. Then, find a rubber band, string, and a match to complete your item list. You the put the rubber band on each screw, so it extends between the gap. Taking the string, you wrap it neatly around the rubber band. Then, you take the string and pull it all the way back, and wrap the string around other screw on the opposite side of the block. Now, your contraption should be complete. Carefully take the match, and light it. Take cautions with the flames and make sure that you don't burn yourself. Light the mid section of the string on fire, and your block that you inserted in between the rubber band, will shoot in one direction, while the sled rolls away on the other direction.
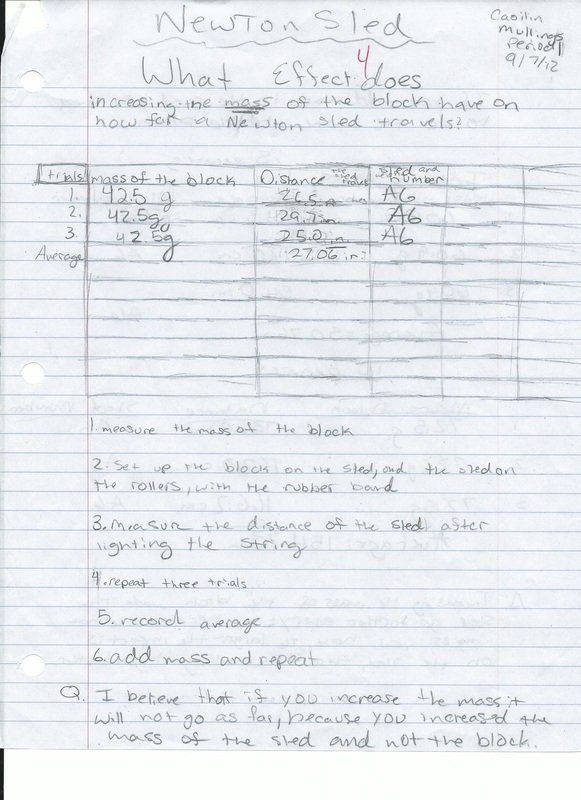
Each block is specifically labeled, so you can use it to record your data. Using a blank piece of paper would be one choice of jotting your data down. On the screen shot to the left, there should be only three columns you use. The first column should be filled with the mass of the block. That can well be determined by using a scale. The second column is the distance, in which the block is thrown at. The third column is simply the label of the block and sled. Next, you should try to come up with questions that you would help you solve the main question. For example, you could have something such as: How does increasing the mass effect the distance in which the block flies? Asking the questions are a very important process to this project. I especially learned that teamwork is another important factor.
Each block is specifically labeled, so you can use it to record your data. Using a blank piece of paper would be one choice of jotting your data down. On the screen shot to the left, there should be only three columns you use. The first column should be filled with the mass of the block. That can well be determined by using a scale. The second column is the distance, in which the block is thrown at. The third column is simply the label of the block and sled. Next, you should try to come up with questions that you would help you solve the main question. For example, you could have something such as: How does increasing the mass effect the distance in which the block flies? Asking the questions are a very important process to this project. I especially learned that teamwork is another important factor.
Fins and Flight
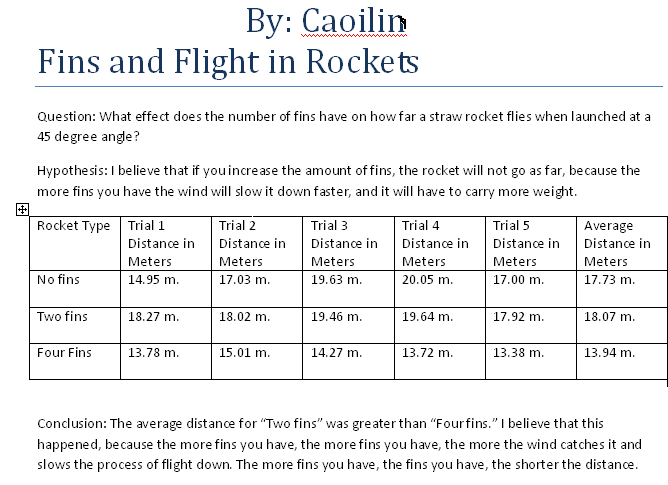
This project was mainly to find the difference that would occur if you added more fins to a straw rocket. The straw rocket is constructed from a straw, paper fins, tape, and clay. First you cut out the fins and paste them onto the rocket, then you add the clay to the TOP of the straw. Constructing the rocket is fairly simple. Next you take a launcher and launch the rocket. Measure the distance and repeat the same process for four more trials. Once you complete all the trials, you must find the average distance of all FIVE trials. Putting together this project isn't complicated, and the best part is, you don't need sophisticated tools or objects. This experiment would be fun to try at home.
This specific project taught me how to carry out work on my own. Cooperation with a partner was also needed for this project. Learning the steps of investigations, and knowing how the control variable affects the experiment is the most important. Science and math are needed for calculations, and the experiment itself. I believe that this assignment was especially fun and simple to do. The tools that were used to construct this document, was Microsoft word. Microsoft word really helped with this assignment, because it allowed me to insert a chart to store my data.
*THERE MAY BE TYPOS IN THE CHART ABOVE!*
